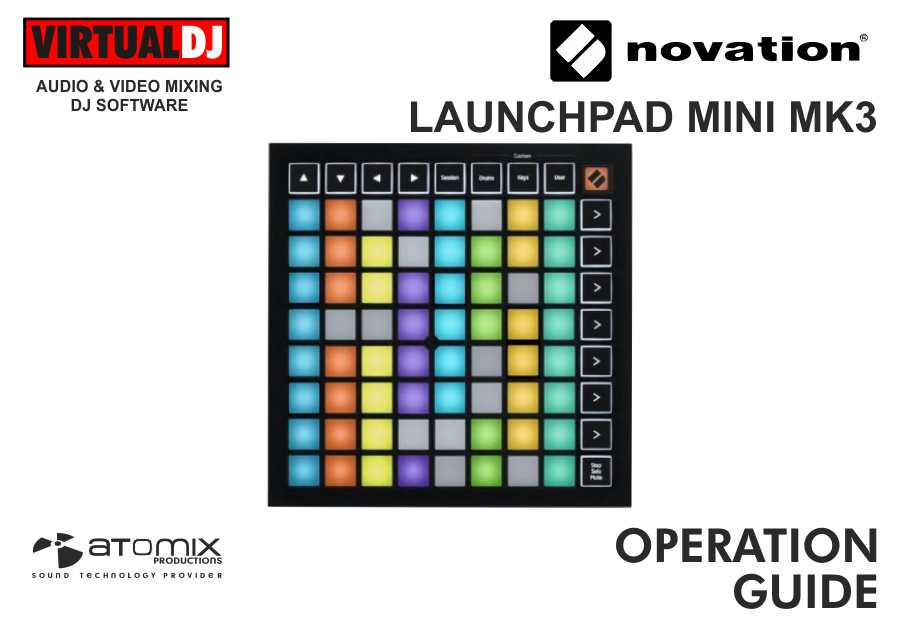
NOVATION LAUNCHPAD MINI MK3I
SETUP
Drivers
No driver is required to be installed for Mac OSX or Windows computers.
Simply connect the unit’s USB socket with a USB port of your computer
VirtualDJ Setup
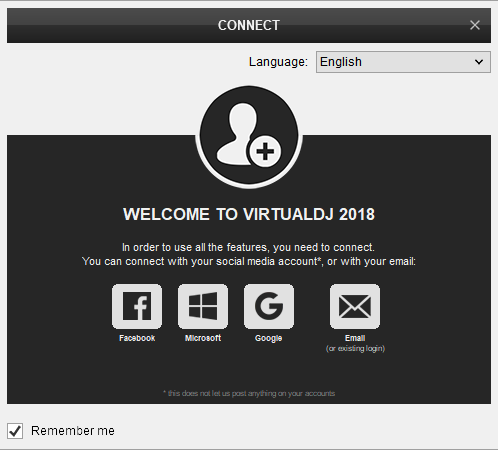
Once VirtualDJ is opened, a Connect Window will appear. Login with your virtualdj.com or your social media account’s credentials.
A Pro Infinity, a Home PLUS or a Pro Subscription License is required to use the Novation Launchpad Mini MK3. Without any of the above Licenses, the unit will operate for 10 minutes each time you restart VirtualDJ.
http://www.virtualdj.com/buy/index.html
Click to OK.on both of them
The unit is now ready to operate.
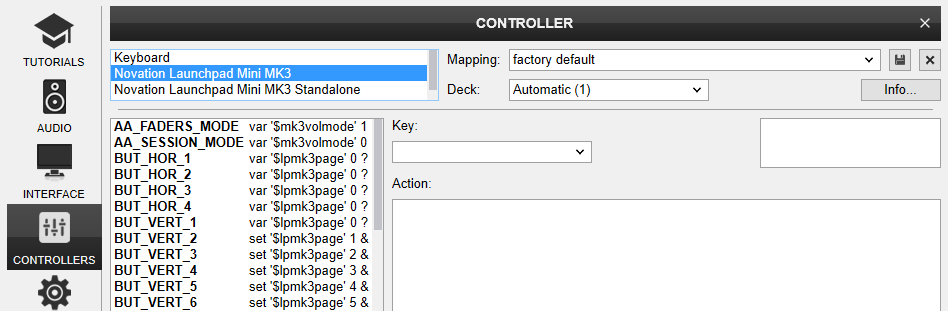
MIDI SETUP
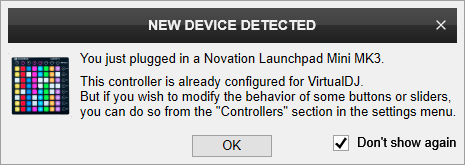
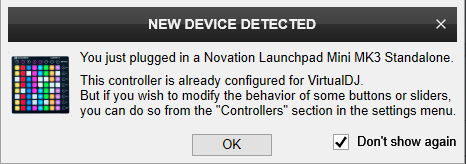
The unit should be visible in the CONTROLLERS tab of Config as 2 separate devices (Mini MK3 and Mini MK3 Standalone) and the “factory default” available/selected from the Mappings drop-down list for each one of them.
The factory default Mapping for the Novation LaunchPad Mini MK3 device is carrying the actions assigned to the Pads when the device is in Session mode (selected from the top row of buttons).
The factory default Mapping for the Novation LaunchPad Mini MK3 Standalone device is carrying the actions assigned to the Pads when the device is in any Custom mode (Drums, Keys and User) mode (selected from the top row of buttons).
The functionality of each device is described in this Manual, however those can be adjusted to your needs via VDJ Script actions.
Find more details at http://www.virtualdj.com/wiki/VDJscript.html
AUDIO SETUP
The unit is not offering any built-in audio interface and VirtualDJ will use your computer’s built-in sound card by default (if not any other is chosen).
Depending on the sound card you need to use, manually create the necessary Master and Headphones audio configuration. See more in Audio Setup of VirtualDJ Manual
For further software settings please refer to the User Guide of VirtualDJ 8.
http://www.virtualdj.com/manuals/virtualdj8/index.html
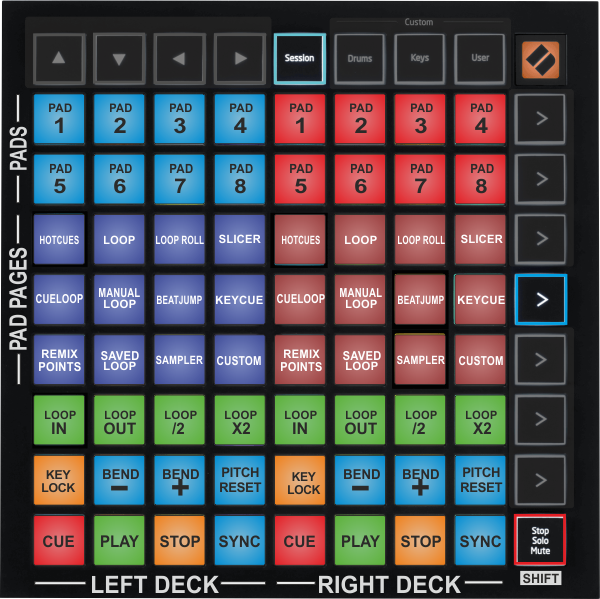
CONTROLS - SESSION MODE
The default mapping of the unit for VirtualDJ offers 7 different pages when in SESSION mode and those can be selected by using the first 7 vertical round buttons of the right side of the unit.
The very bottom round button is used as SHIFT to offer secondary actions (marked with white background in the following pictures)
Pages 1 to 4 have pre-selected VirtualDJ actions. Pages 5 to 7 are unassigned to allow you creating your own custom pages with the needed actions depending on your mixing style.
See more details in Advanced Setup section.
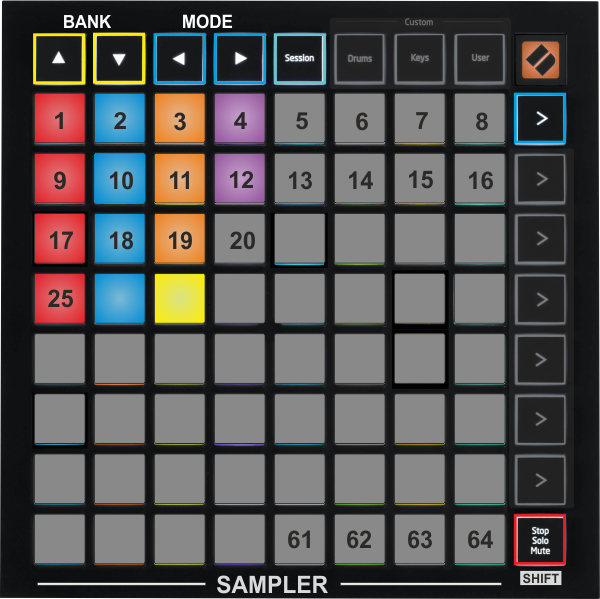
Page 1 - Sampler
Press the 1st Vertical round button to select the Sampler page (led will become cyan). The Sampler page will be automatically selected each time you launch VirtualDJ.
The 64 Pads trigger Samples 1 (top-left button) to 64 (bottom-right button) from the selected Sampler Bank.
Normally the Leds of the Pads will have the assigned color of each Sample.
In most cases, when the Sample plays, the color of the Led will have more brightness. Led will be off if a Sampler slot is unassigned (empty)
Hold SHIFT and then press the same Pad to stop the sample (useful if the Unmute or Stutter Trigger mode is selected).
Use the first 4 top buttons to select the next/previous Sampler Bank and the next/previous Sampler Trigger mode (On/off, Stutter, Hold and Unmute)
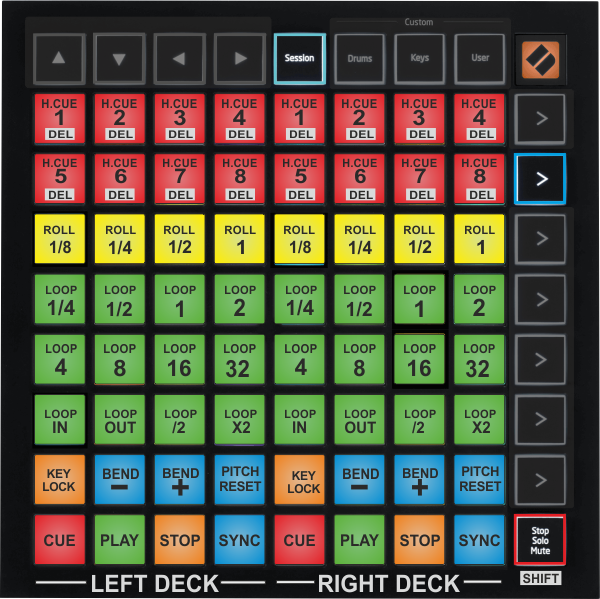
Page 2 - Deck Controls
Press the 2nd Vertical button to select the Deck Controls page (led will become cyan).
The 64 Pads offer Transport, Tempo, Loop, Loop Roll and HotCues functions as per the image below (left side for left deck and right side for right deck).
Hold SHIFT down and then use the Pads at the 2 top rows to delete the assigned HotCues for the left/right decks.
The top round buttons are unassigned.
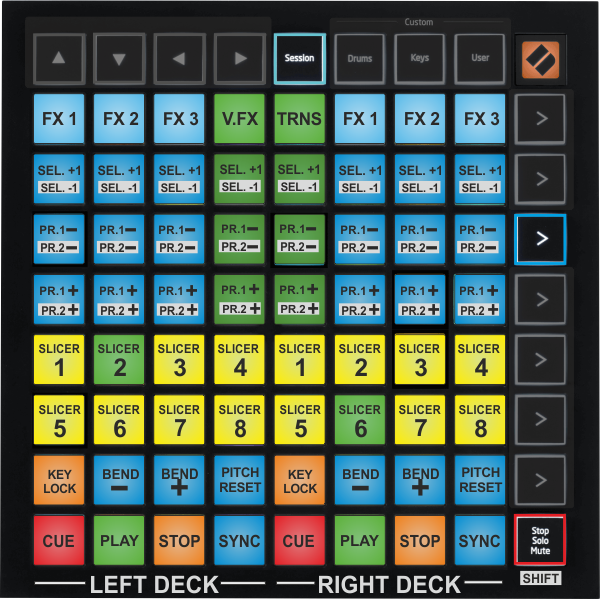
Page 3 - Effects
Press the 3rd Vertical button to select the Effects page (led will become cyan).
The 64 Pads offer Transport, Tempo, Slicer, Effects and Video FX and Transition functions as per the image below (left side for left deck and right side for right deck)
Hold SHIFT down and then use the Pads to get the secondary functions (labeled with white background as per the image)
The top round buttons are unassigned.
Page 4 - Pads
Press the 4th Vertical button to select the Pads page (led will become cyan).
The Pads of the lower 3 rows offer Transport, Tempo and Loop controls for Left and Right decks, exactly like Pages 2 and 3,
The top 2 rows control the Pads 1-8 of the selected Page. The functionality of each pad depends on the selected Pads page. Hold SHIFT and then press any of the Pads to get the assigned shift-action (e.g. SHIFT+PAD1 to delete the Hotcue 1 when the Hotcues Pads page is selected)
Use the buttons on rows 3, 4 and 5 to select a Page for the pads (all the currently default Pads pages are included).
Custom Setup
The default mapping of the unit for VirtualDJ, offers 4 pages with pre-assigned functions.
Pages 5 to 7 can be used to assign any VirtualDJ actions and create your own custom ones.
Each one of the PAD_X_Y keys is based on the following pattern.
var ‘$lpmk3page’ 0 ? VDJ action for page 1 : var ‘$lpmk3page’ 1 ? VDJ action for page 2 : var ‘$lpmk3page’ 2 ? VDJ action for page 3 : var ‘$lpmk3page’ 3 ? VDJ action for page 4 : var ‘$lpmk3page’ 4 ? VDJ action for page 5 : var ‘$lpmk3page’ 5 ? VDJ action for page 6 : VDJ action for page 7
The first 4 VDJ actions (for pages 1 to 4) are already assigned. The actions for pages 5 to 7 are pre-assigned as nothing.
How to:
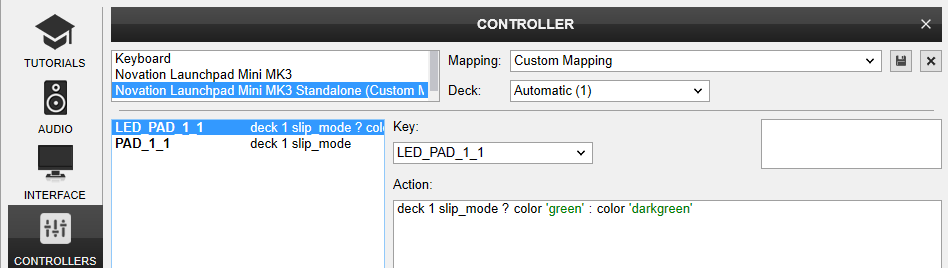
In the following example, we need PAD_8_1 (bottom row – 1st Pad from the left) to be assigned to toggle Slip mode for the Left deck when Page Nr.5 is selected and its LED to light up green when Slip mode is enabled.
For the PAD:
- Goto Settings ->CONTROLLERS tab of VirtualDJ and select the Novation Launchpad Mini MK3 from the Devices list (top-left side of the window)
- Locate the Key PAD_8_1 from the Keys list (left side) and select it.
- From the action box, replace nothing with deck left slip_mode in the part that holds the action for Page 4 (variable value 3)
So the action …
... var ‘$lpmk3page’ 4 ? nothing : var ‘$lpmk3page’ 5 ? ….
will become…
... var ‘$lpmk3page’ 4 ? deck left slip_mode : var ‘$lpmk3page’ 5 ? ….
For the LED:
- Locate the Key LED_PAD_8_1 from the Keys list (left side) and select it. This key will determine how the LED of the Pad will behave,
- From the action box, replace nothing with deck left slip_mode ? constant ‘green’ : off
So the action …
... var ‘$lpmk3page’ 4 ? nothing : var ‘$lpmk3page’ 5 ? ….
will become…
... var ‘$lpmk3page’ 4 ? deck left slip_mode ? constant ‘green’ : off : var ‘$lpmk3page’ 5 ? ….
Read more about VDJ script actions in our Wiki pages http://www.virtualdj.com/wiki/VDJ8script.html
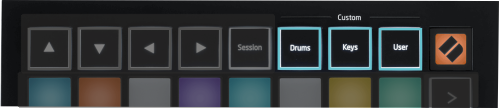
STANDALONE DEVICE MODES
The Novation LaunchPad Mini MK3 is offering 2 separate Midi sub-devices as seen in Controllers tab of VirtualDJ.
When the Session mode (default) is selected from the top buttons, the device operates as explained in the previous manual pages. The 2nd (Standalone) device is defined with all the Keys and Leds, but not assigned to any VDJ action. It is meant to be used with VirtualDJ and create your own custom mapping, or set to Ignore in order to use this device with a 3rd party software such as a DMX lighting application.
The functionality of the Standalone device is offered when the device is set to one of the Custom mode buttons Drums, Keys and User.
Below is an example of custom mapping for PAD 1 assigned to control the slip mode of Deck 1, when the device is set to USER mode (last button of the top buttons)
Notes for Custom modes.
- All 3 Custom modes (Drums, Keys and User) correspond to the Standalone device.
- The order of Pads in the Custom modes may be different. The numbers of the buttons are selected based on the order the buttons have in User mode, but may differ from the ones the other modes offer. E.g. PAD_1_1 (top-left) when in User mode will not be top-left in the other 2 modes. Therefore it is preferred to use the User mode for your custom mapping
The image below is showing the Standalone device set to Ignore, in case you need to use this device with a 3rd party application
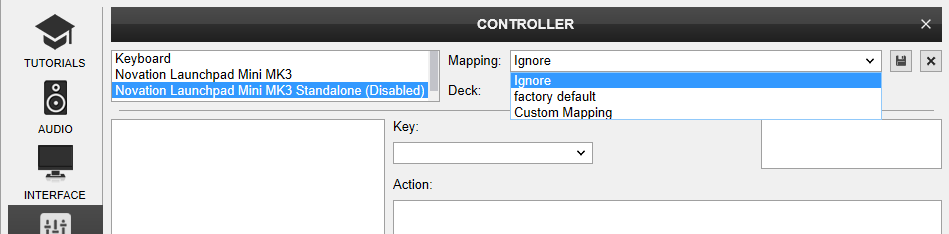
Note: In case of setting a device to Ignore, not action will be triggered from this device, even if there is an assigned action to any key.
